

So you want to learn how to create a WordPress website with DreamHost?
You’re in the right spot!
First Things First
I currently use DreamHost for my website hosting and WordPress as my content management system (CMS). I have a few domains and clients on Bluehost, so I recommend them as well. I haven’t created a “how-to create a WordPress website with Bluehost” here, but let me know if you’d be interested in that. I’ve found DreamHost to be a little easier for me to use (less clutter), although I recommend Bluehost to some clients that want to handle their own hosting service because Bluehost uses a cPanel.
What’s needed to complete this guide:
-
-
- The name of the website you want to build (don’t worry, I’ll show you how to register it).
- A credit card to purchase a hosting subscription and domain name.
- A can-do attitude.
-
Step 1: Research a Domain Name
I had a school counselor that would always say, “you gotta mind your 6Ps.” And then she’d say, “Prior Proper Planning Prevents Poor Performance.”
She’s right, and what will make you a bit happier with your domain name is spending some time to brainstorm a few options. Often, you’ll find that the name you want is taken, so it’s a good idea to have 3-5 ideas of what domain would work for you.
Ok, so maybe I just talked past a few of you so let me clear up what a domain name is.
Some people refer to is as a “website address,” others refer to it as a “domain url.” The main point is that whatever you type in the browser window to get to particular website is the domain name.
Ever hear of www.facebook.com? Well, the domain name for Facebook is “facebook.com.”
Ok, now that we got that squared away, I recommend that you pause on this guide until you have your 3-5 domain names. I guess if you want to read through it that’s ok, but if you are serious about creating a website I recommend you download the website guide below and work through it to get your domain names squared away.
Here is a guide you can use to choose a domain name
If you feel like, “ain’t nobody got time to read a guide” just look over the brief notes below.
Keep in mind when purchasing a domain name:
-
- It will be the name of your website, for example, “josephbojang.com” is my domain name for this website. Choose something that is meaningful and users can guess at the content of the website.
- It may be the the name of your e-mail address, so keeping it short is a good idea. Imagine if my domain url was “learnhowtobeawebchampinjustalittlebit.com”? People may mistakenly type in that domain when sending an e-mail to me.
- Choose the “.com” if possible. The main reason being that most people are used to typing in .com. When I purchased the webchamps domain the .com wasn’t available.
- Purchase other Top Level Domain (TLD’s) to protect your brand. For example, purchase the .com, .net, and .org if you have the budget to do so. Imagine if Google forgot to purchase their .net domain name.
So you have your potential domains names and you’re ready to go.
Jump to step number 2 so that you can register a domain name and purchase website hosting together. If you already have a domain name that you purchased from a different domain registrar I, I wrote a how to point your domain name guide in another post.
Step 2: Register a Domain Name & Purchase your Hosting
The first thing you’ll need to do is go to DreamHost.com and start the process of registering your domain name and web hosting.
If you haven’t already, click this link, and you should be directed to the DreamHost website. Once on the DreamHost website click on the “Hosting” link at the very top. It should take you to a page that looks like the image below (keep in the mind the button text may change over time, but what you’re looking for is the Shared Hosting plan).

Once you click the button you’ll be directed to another page, which will explain the benefits of hosting with DreamHost.
Some of the main take-aways:
-
- Free domain name as long as you host with DreamHost (approximately a $15 discount)
- Domain privacy, which means if someone looks up the owner information of your domain name it will have DreamHost’s information. Not your personal information, this is very cool.
- You can purchase as many additional domain names as you want and host them with the same account.
Once you’ve clicked-through the benefits page you’ll then land on a registration page. Things can go pretty quickly here since there are only four parts to registering: Create an Account, Register a Domain Name, Purchase Hosting, and then The Money Part.
Create an Account
This is pretty straight-forward, you only need to do two things: enter your e-mail address and create a password.
Make sure you have complete access to this e-mail address and that you don’t plan on getting rid of it anytime soon. DreamHost will send all of your important information to this address, plus you’ll login with these credentials to view your account.
Choose your Domain
After creating an account you are then directed to the domain page. Remember those 3-5 domain names you picked earlier? Well, now we get to see which ones are available.
You’ll see a page that looks like the image below, even if you already have one domain you’ve purchased someplace else. You can still get another domain on DreamHost. I recommend you do.
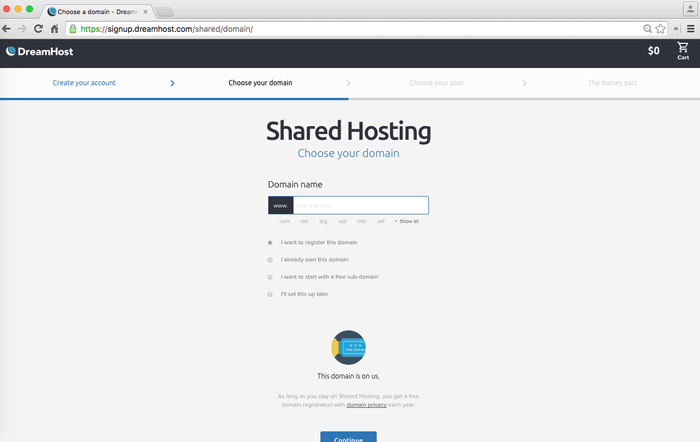
In the box below the text that reads “Domain name” you’ll want to enter your domain name without the www (since it’s already there in the dark grey area).
Enter in the *most* desired domain name that you want. After you type in the name have a little patience, because it take a few seconds or so to determine if the domain name is available. If it is, you’ll see a faint green highlight around the box and pop-up message that reads something to the effect, “that domain is available to register.”
Make sure to check the “speeling” (see what I did there) and then select the radio button that reads, “I want to register this domain.”
Like a previously mentioned before, if you already own the domain name you want, just type it in and select the second radio button. Keep in mind you are foregoing your FREE domain name (there are some caveats I won’t mention here, but just go ahead and get your free domain name, trust me).
Once you are sure everything is complete and you’ve read all the text on the page. Click the continue button to move on to the next section.
Choose your Hosting
I recommend the 1-year plan, but, if you have the budget go ahead and get the 2-year plan since you’ll end up saving $12 dollars a year.
I haven’t had any issues with DreamHost and will continue to recommend them. So, I think you’ll be fine with either the 1-year or 2-year plans.
The Money Part, a.k.a, “You’re almost done!”
I’m sure you know what to do here, but I wanted to give you one thing.
You’ve made it all the way through this guide and you’re about to embark on creating something that matters to you and others. So, I want to give you something for reading this far…
Use this discount code (WebChampsGuide) to get $10 dollars off your hosting, this is the only place I have this code on the website, by the way.
Step 3: Login to DreamHost and Domain Setup
Yay! You’ve successfully completed payment and you’re closer to launching a new website!
It shouldn’t take DreamHost too long to verify your account and for theme to send you all of your login credentials.
You’ll probably receive an e-mail stating your purchase has been processed. But, the one we are looking for is one that says your account has been approved.
Once you get the account approval e-mail you are ready to login to DreamHost and create your WordPress website.
Login to DreamHost
You can go to www.dreamhost.com and then click the “Login Button,” or copy and paste https://panel.dreamhost.com/ to go directly to the login page. Once there enter in your credentials that you used to create the account when you were initially signing up.
Once logged in, you’ll see the DreamHost Dashboard that looks similar to the image below.
You’ll want to click on the “Domains” link in the left sidebar.

Once you click the Domains link you’ll then see the sidebar expand and a link for “Manage Domains” will appear (see image below), you’ll want to click it.

After clicking on the Manage Domains link you’ll see that middle content area of the page refreshes. It will have the domain name that you purchased under the Domain column. The image below has the red text that reads “yourdomain.com,” this is where your domain will be.
You’ll also see a “Web Hosting” column that has the text “DNS Only.” You’ll want to click “Add” to begin the setup of this domain (see image below).

*Note: because I own several domain names you’ll see that there is a row above the “yourdomain.com” row. You shouldn’t necessarily expect to see two rows here unless you purchase an additional domain name. I’ve covered the domain name and web hosting details with white blocks so that it is less distracting.
After you click “Add” you’ll be directed to the Fully Hosted page. This page is to set up your domain details. I have more images for you below, so you can pretty much do exactly what’s in the image to complete this step. Nevertheless, I’ll go through what’s happening.
Here are the sections to this page you’ll need to fill out:
-
- Domain to Host (if it’s not already filled in, put in your domain that you registered): yourdomain.com
- Do you want the www in your URL? More than likely you’ll check the second radio button that begins with “Add WWW:…” There may be some of you that prefer the third radio button that begins with “Remove WWW:…” In either case, I recommend only those two options.
- Users, Files, and Paths: this is up to you, but if you plan to have multiple websites I’d recommend that you “Create a New User (Recommended)” each time you create a website.
- I recommend you leave the “Web directory” and “Logs directory” alone, unless you know what you’re doing. 🙂
- PHP mode: leave it alone. In the screenshot below the current version is PHP 5.6, depending on when you read this guide it may be a later version. In any case go with whatever is the default.
- Automatically upgrade PHP: more than likely you want to leave this checked, just like the screen image below.
- Extra Web Security? Sure, we could all use more security on our website.
- Leave everything else unchecked unless you know specifically what you want.
- Click the button that reads “Fully host this domain.” This means that you will now have a fully hosted website. You’ll see a green “success message” appear on your screen if you’ve done everything correctly.


Step 4: WordPress Setup & Login
Give yourself a pat on the back, because you’re almost done!
This is the last section where we complete the setup and login to WordPress.
To begin, look at the left sidebar again, there should be a link that says “Goodies,” click it.
After you’ve clicked the Goodies section you’ll find that the left sidebar will expand to show additional options (see image below). You’ll want to click on “One-Click Installs” and then on the WordPress icon.

After you’ve clicked on the WordPress icon a pop-up window will appear that looks like the image below. In the “Custom One-Click Installer” area most likely you’ll want to do the following:
-
- Install To: use the arrows in the box to choose your domain that you registered.
- Select Database: leave it as default, which is “Automatically Create Database.”
- Deluxe Install? I recommend that you uncheck this box. Essentially, this will give you more themes and some other features. I think it’s best to stay simple, for now. 😉
Once you complete all the steps in this dialogue box click on the “Install it for me now!” button that will create an instance of WordPress for you.

Yipee! You almost there!
It will take about 10-20 minutes for WordPress to be completely set up. DreamHost will send you an e-mail after the install completes and tell you how to login.
I’ll go ahead and quickly run through that part here.
Login to WordPress
In the e-mail that you receive from DreamHost the first step will be to click a link that looks like this: http://www.YOURDOMAIN.com/wp-admin/install.php (capitalization added to show you where your actual domain name will be.
Click that link and then you will begin the last configuration process.
After clicking the link it will take you to a WordPress page to choose the language you want to use for your website. After selecting the language you plan to use it will take you to a page that looks like the image below.
I believe it is straight-forward, but I’ll go ahead and point out a few things for you to keep in mind.
-
- The Site Title is just the name of your website but can be whatever you want it to be.
- The username can be anything, please try to stay away from using the word “admin” anywhere in your username.
- I suggest using the strong password that WordPress generates for you, or slightly modifying it.
- If you don’t want people to happen upon your website through a Google or Bing search make sure to check the “Discourage search engines from indexing this site.” You can always turn this on later when your website is complete.

That’s it, once you click the “Install WordPress” button your website will be live. You’ll get a “success message” and then have the option to login to the WordPress dashboard.
You did it! Now, quit reading this blog and get to setting up your website. I have few resources for you below.
Further WordPress Reading and Help
First off, if you run into anything in particular and have a quick question use my contact page to e-mail me a question. But, here are other places you’ll be able to find help:
-
- https://wordpress.org/search/support – this is a good place to go ahead and register even if you don’t need help immediately. The support forum has tons of answers to questions that you’ll probably be looking to resolve. So, when you get a moment you should check it out.
- https://central.wordcamp.org/ – if you live in an area that puts on a WordCamp conference it’s a great place to learn. You’ll be able to attend all types of training sessions and it’s usually very cheap.
- http://wiki.dreamhost.com/Main_Page and https://discussion.dreamhost.com/ -now that you’re a DreamHoster get in the know and ask some questions on the forum boards or search for answers on the Wiki they have.
- http://wordpress.meetup.com/ – another place where you can find local WordPress people that get together to teach and help each other.
Thanks for reading and I hope it was helpful. If you have any suggestions on what would have made this guide better, go ahead and reach out to me on what I could update.